Archive for the ‘Maintenance’ Category.

Transfer Pump Failure

Short recap for those unfamiliar with my setup:  My truck stores WVO in a pair of 60gal GFS Trekker tanks.  I treat the rear-most tank as my “dirty” tank and only pump WVO into that tank.  I treat the forward-most tank as my “clean” tank and feed the 7.3L PSD engine from that tank.  Each time WVO leaves a tank, it passes through a Racor 1000 fuel filter and a 2020SM (2-micron) filter.

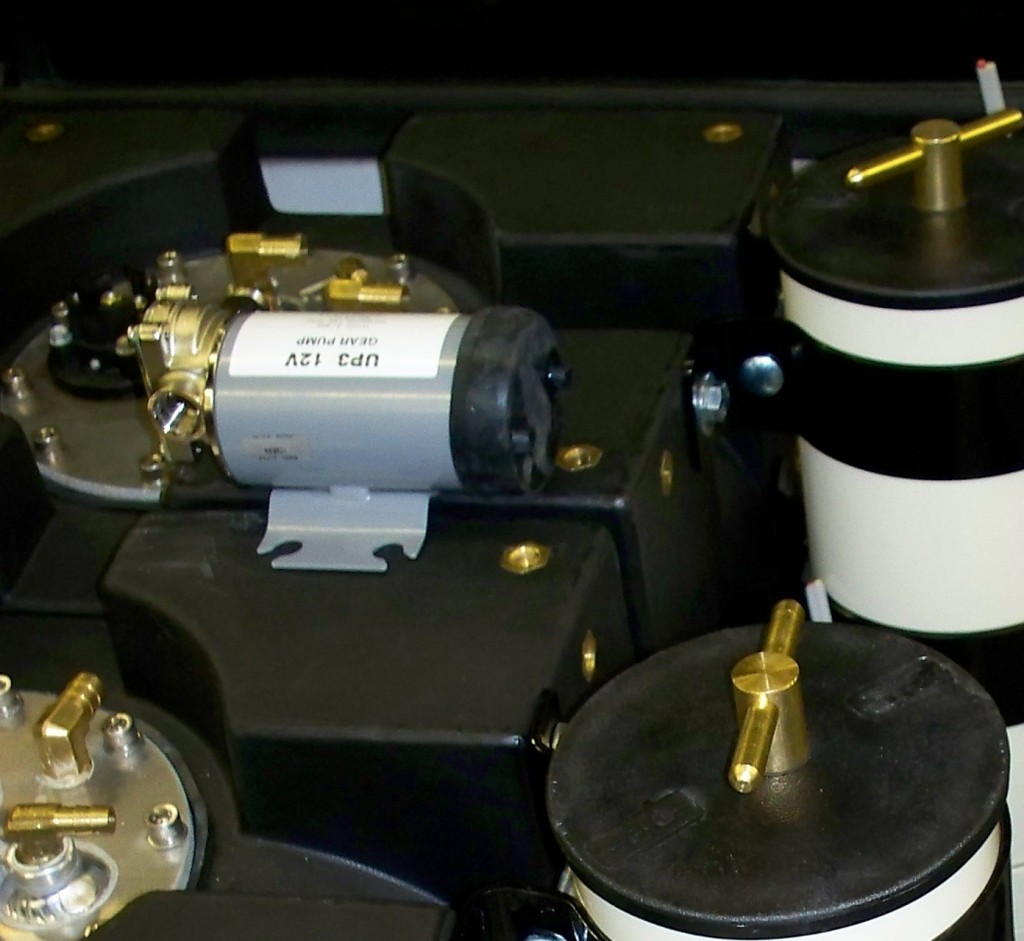
I use a small 12V gear pump to transfer WVO from the “dirty” tank to the “clean” tank.  The WVO is pulled out of the “dirty” tank, through the Racor 1000, through this 12V gear pump, and then sent to the “clean” tank.  I use a switch in my dash to turn the pump on/off.  Do NOT forget to monitor the fuel level in the “clean” tank.  I have had a big mess on more than one occasion because I pumped too much WVO into the “clean” tank.

This transfer pump failed (again).  The first failure occurred in 11/2009.  I do not recall why it failed and did not seem to write about it.  This time, I left the pump running for a very long time and ruined it.  Golden Fuel Systems sold a replacement “One/Half Shot Pump – OSP01” for around $260 after S&H in 2009.  I received a Fill-Rite FR1602 pump.  I learned that GFS would remove the gear pump from the enclosure and discard the enclosure.  The internal pump that Fill-Rite was using in the FR1602 is a “Marco UP3/OIL 12V gear pump” (P/N: M164-020-12).

I contacted GFS to purchase another replacement.  They informed me that they are unable to provide an exact replacement (Fill-Rite discontinued the FR1602).  They are now selling a much more expensive GFS Gathering Pump Kit for $415+S&H.  The new pump may be superior (or not), but I preferred an exact replacement because I had already fabricated a custom mount that allowed me to attach the “Marco UP3/OIL 12V gear pump” to the side of my fuel tanks between the two Racor 1000 filters.  I was able to find several FR1602 and Marco UP3/OIL products in the $225-250 range.  Sharing in case anyone else is needing to replace this pump, but did not have the Fill-Rite or Marco part numbers.  Good luck!


gfs-marco-up3-oil-12v-gear-pump

Leaking Ford 7.3L Oil Cooler Seals and Gaskets @ 374k

I parked my F250 in our attached garage last winter, which means I rarely had to start it in cold conditions.  The garage has insulated doors and rarely drops below 45-50F.

I began restoring my 1950’s Chevy truck this summer and it currently lives in the garage.  Now that I’ve begun cleaning up and/or replacing many mechanical items, I hate the though of parking it outside if I can avoid it.  That means the F250 is going to see a lot of cold starts this winter, unless we decide to move to a house with a larger garage or build a shop in the near future (both are unlikely).  As a result of the cold starts, I am beginning to have several issues with old/brittle seals and gaskets failing on my 2002 Ford 7.3L PSD.

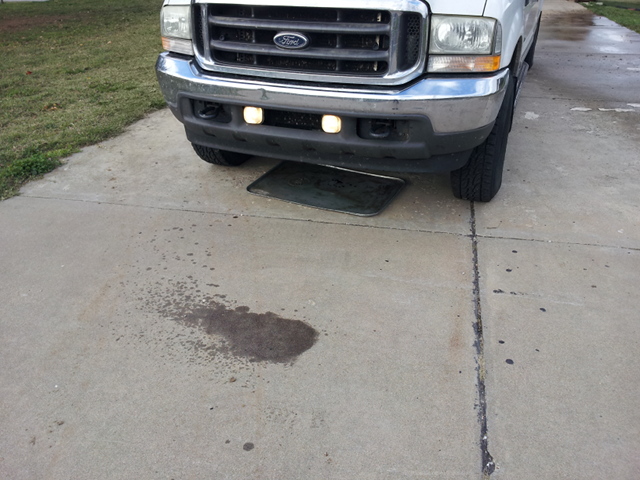
One of our first cold mornings of the year was 10/26/2012.  I started the F250 and immediately moved it to the end of the driveway to warm up so that it would not be in the way while moving some things in and out of the garage.   The 7.3L PSD left an 8″ to 10″ pool of oil at the end of the driveway after warming up for about 5-10 minutes.  There was no spill where the truck had been parked overnight.  The engine stopped leaking after it was warmed up.  I immediately soaked up the oil with rags and then thought to take a picture showing the size of the spill (see below).  We had a very strong north wind (blowing from right to left).

I was unable to determine the source of the oil leak.  My mechanic couldn’t tell either because there was such a huge mess of oil on the underside of the truck.  He had me add dye to the motor oil around 11/12 and come back a few days later.  He was able to confirm the leak was coming from the oil cooler on 11/15 and determined that we could replace all of the (expensive) seals and gaskets for around $200 (parts) compared to replacing the entire oil cooler for around $1000 (parts).  I believe there were 4 seals and 1 or 2 gaskets.  He showed me how brittle the old seals were afterwards.  When you bent them, they just cracked apart!  The work was completed on 11/19/2012.  I have had several cold starts since the repair, without any oil leaks!

The following pages describe the same issue I was having and these people seemed to perform the same repairs:

http://www.powerstroke.org/forum/94-98-7-3-motor-problems/199173-oil-cooler-leaking-oil-drivers-side-motor.html

http://www.dieselbombers.com/ford-powerstroke-99-03-7-3l/62581-oil-cooler-leak.html

Status Update

Just posted my three most recent UOA for all to see.  Was glad to hear that the contamination was NOT coolant related.  I was loosing coolant, but it turned out that the worm clamps I used to splice into the coolant lines at the heater core had gradually loosened up and just needed to be tightened.

Truck is running fine overall, but a few items need attention.  Most of them are minor in the overall scheme of things.

Need new mud flaps for rear wheels.  Having trouble finding them locally.

Need to fix driver’s seat warmer.  Light comes on when you push button, but no heat.

Need to pull the seats and carpet so I can finish installing sound-deadening materials.

Fuel Pressure Gauge still gives me fits from time to time.  Just can’t seem to get the air hose to seal up well enough.  Gauge will work fine and show correct pressure (~60 psi) for 3-4 weeks, then will gradually loose pressure over 1-2 days until it reads 0 psi.  I think the connection at the back of the gauge is solid, but am suspicious of the connection at the fuel-air diaphragm and a union in the air line.  I think both need to be replaced.  Seems that the small copper rings in the union are not staying perfectly straight/even/aligned when I tighten up the union.  Maybe I should use some sealant when I’m putting this together .. or maybe I just need to be more careful.

Transmission Temperature Gauge is suddenly having some sort of electronic issues.  Gauge will randomly display anywhere from 0F to 250F and often pegged at 0F or 250F.  Problems started within past 4-6 weeks.  I bought a pair of these gauge kits for two trucks.  Turns out that this same problem is happening on BOTH trucks.  Checked connections.  Suspecting an issue with either the control boxes (I think this gauge uses one) or the gauges themselves.

Truck is having trouble starting unless I leave it plugged in.  Starting temps have been 35F-45F lately.  Pretty sure my glow plugs are shot.  Going to investigate in the coming weeks.

Transmission Fluid and Filter change is past due.

I purchased a 1998-2005 Ford Auxiliary Input Converter (FRDN-AUX) from LogJamElectronics.com in 09/2010.  I thought this would do a better job of playing music from my phone since I seem to have trouble with cassette adapters and I often travel 4+ hours at a time.  It seemed like a good idea, but the device seems to shut off after I’ve been using it after a while.  At first it worked fine for entire (4+ hour) trips but now it is pretty unreliable.  Sometimes it’ll work well for hours.  Other times it wil only work for 10-20 minutes.  Very frustrating.  I sent an email to support a moment ago asking if they had any suggestions.

Update:  LogJam Electronics replaced the device under warranty.  The replacement arrived in retail packaging. LogJam was great to work with but I was still pretty frustrated with the whole situation, so I listed it for sale as a new item on Amazon.com and it sold right away.

High Fuel Pressure (75-100+ psi) on 7.3L PSD

My last update briefly mentioned a recent problem with high fuel pressure.  I wanted to expand on that since I was *not* able to find a solution online.  I started swapping parts with another 7.3L PSD until I pinpointed the problem.

Baseline:

My fuel pressure gauge (0-100 psi) usually shows 60 psi max pressure.  The gauge is connected to an isolator via an air tube.  The isolator is connected to the rear passenger side of the fuel filter bowl (aka water separator bowl) via a braided steel fuel hose and reads the pressure (on the clean side of the filter) in the fuel filter bowl.  The gauge normally reads 60 psi.  When running diesel or *hot* WVO, my pressure hardly drops from 60 psi, except during WOT (wide open throttle).  Even then, it rarely drops below 35-45 psi.  It seems like my pressure never exceeds 62-64 psi, usually higher than 60 psi for only seconds after letting off WOT.

Symptoms:

While on a long-distance trip, my gauge suddenly spiked to 100+ psi (max reading on gauge).  I looked things over during the next stop, but didn’t see any obvious problems.  Later the same day, I could smell WVO while driving.  Pulled over and found that the fuel filter cap had cracked along the lip and was spraying WVO in the engine compartment.  Replaced the fuel filter cap and was up and running again.

Summary of Fuel System (2002 F-250 7.3L):

My understanding of the fuel system, based on hours of research and diagram reviews, is as follows. The fuel pump (mounted to frame below driver’s feet) pulls fuel directly from the tank and pressurizes the fuel supply up to the fuel bowl.  Sounds like this 12V factory fuel pump can output somewhere between 110-130 psi.  There is a housing on the top driver’s side of the fuel filter bowl that contains the pressure relief valve and feeds the return line that sends fuel back to the tank.  The housing and it’s contents (sleeve, plunger, springs, seals) are designed to let excess fuel/pressure return to the tank so that pressure in the fuel supply and fuel bowl do not exceed 60 psi.

Diagnosis / Solution:

I disassembled the fuel pressure relief housing (and contents), clean the contents and reassemble everything.  My fuel pressure rode between 70-80 psi for a while, but gradually increased to 85-90-95 psi over the course of 20-30 minutes.  The fuel pressure eventually returned to 100+ psi (guessing 110-115 psi, based on how much fuel it took to drop the pressure below 100 psi).  I would get the exact same results if I disassembled and cleaned everything again.

I thought my return line was clogged.  I blew out the return fuel line with an air hose.  Exact same results as above.  Pressure gradually increased to 100+ psi again.

The return line connects to the housing with some sort of compression fitting.  Someone else suggested (here) that they were able to resolve my symptoms by making sure that the return line was pulled out (to the driver’s side) as much as possible when the hex head/fitting was tightened.  This did not fix the problem either.

Ran this problem by the head service tech at our local dealership (Terry?).  He did some quick research and confirmed that the fuel supply pressure specifications considered 45-80 psi to be the safe range.  He suggested I replace the fuel pressure relief kit inside the housing (sleeve, plunger, spring, seals) and agreed that the issue had to be in that general area.

I swapped the pressure relief kit with another 7.3L.  No luck.  I swapped the small metal housing that holds the pressure relief kit with another 7.3L.  While I cannot explain why, this *DID* resolve my high pressure problem!  I purchased a brand new housing and installed it.  Fuel pressure has been at 60 psi max ever since.

Ford / International Part Numbers:

F81Z-9B249-BB  —  Ford Regulator Module Kit  —  $76.35 (list price)

F81Z-9H323-BB  —  Ford Regulator Valve Closure Cap   —  $51.62 (list price)  —  When I opened the Ford bag, the second bag still had an International Truck and Engine Corporation label!  This is International P/N 1831444C91.

F81Z-9G270-BA  —  Ford Fuel Filter Cap  —  $58.38 (list price)

Summary:

I ended up purchasing/replacing the “F81Z-9H323-BB” housing to solve my high fuel pressure problem in my 2002 7.3L PSD.  Had I known this was a repackaged I/H part, I would have gone to International for a less expensive part.  FYI, you can purchase an aftermarket cap that’s nearly identical to the Ford Fuel Filter Cap for around $20.  The cheaper caps run $12-14.  I keep a spare along in case my fuel pressure ever happens to go through the roof again.

Pictures:

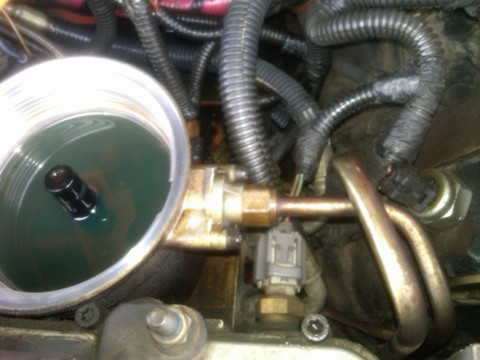
The fuel pressure relief valve enclosure is shown in the center of this picture.  Mounted to the top driver’s side of the fuel filter bowl with a pair of screws (27 star bit?).  The fuel return line is attached to the enclosure with some sort of compression nut.
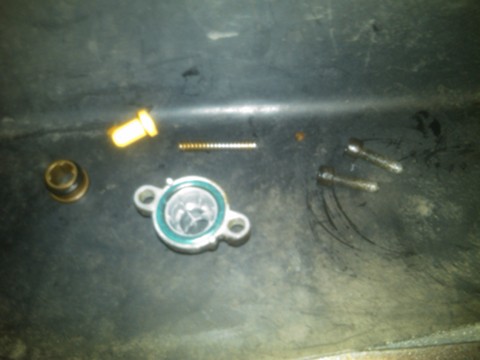
The innards of the fuel pressure relief valve are shown in the picture below.  The sleeve (far left) and it’s seal are pressed into the fuel bowl from the driver’s side.  The yellow/copper plunger slides into the sleeve from the driver’s side.  The spring slides into the hole in the end of the plunger, also from the driver’s side.  Those 3 parts cost $76.35!  The spring pushes against the center of the housing.  I replaced the housing, green o-ring, and two black screws.  Those 4 parts cost $58.38!  Does everyone pay list price, or do I need to do a better job of kissing dealership ass?
Glad this is resolved.  Disappointed by the high prices of these little tiny parts.  Will check with the parts department at International first the next time something like this comes up.
Finally, a Status Update!

It’s been nearly 18 months since my last post.  So much has happened.  It’s a shame that I stopped posting every little detail along the way, but here’s a summary of what’s been happening in my WVO project.

First, the truck (a 2002 Ford F-250 w/ 7.3L PSD) is still running great and is about to hit 310k miles.  I’ve had a few minor bumps along the way, but very happy overall.  I’ll cover the collection and filtering strategy I’ve been using for the past 12-14 months, the problems I can recall, modifications I’ve made to my truck, and try to back-post the Blackstone UOA reports that I have done at each oil change interval.

Collection of WVO

I had been collecting Canola based WVO in small quantities (15-20 gal weekly).  That source became unavailable and then when the source was available again, they had switched to a partially hydrogenated soybean based oil.  Not an option for me. Too bad.

I ended up collecting Soybean based WVO from two local restaurants.  I put a 55-gal drum at each site and used  the lids described on 03/23/2009.  I’m now using different lids.  More about that in a moment.  I pickup from both restaurants every 15-17 days.  Here’s the process from start to finish.  Takes about 50 minutes at each restaurant plus a little over an hour of driving, plus another 15 minutes to unload the drums when I get home.  Just over 3 hours total.

  • Load necessary items in truck:
  1. Two empty 55-gal drums
  2. Container with 12v pump and hoses, and PVC pipe (read #3).
  3. Bucket with custom pickup screen:  The pickup side of the pump uses some sort of reinforced clear HVAC/plumbing hose with a thread connection on the end.  I can quickly thread my original pickup screen (small and clogs easily) or my custom pickup screen onto the end.  I also carry a 3-ft PVC with the same male thread on one end and female thread on the other end so that I can add it in line.  Using the PVC extension makes pickup from barrels much easier.  The custom pickup screen is just an 8 to 12-inch round half-sphere irrigation/drainage cage with metal screen material wrapped around it and safety wired at the top.  I had to use various connectors and a section of hose to adapt from the thread on the cage to the thread on my PVC pipe.  The screen material can be purchased in rolls (for screen doors and windows).  I use black screen, but silver is also available.  The screen provides so much surface area for WVO to pass through, that I hardly ever have clogs or slow pumping.
  4. 5-gal bucket
  5. Roll of heavy-duty “shop” paper towels (ie: $10 at Lowes)
  6. Disposable gloves (ie: cheap at Harbor Frieght, also at Lowes or HD)
  7. Work gloves (I buy new gloves for yard/garden work and use the old gloves for WVO, repeat if the old gloves need to be replaced)
  • Drive to store #1, check oil level (on the way to/from store #2)
  • Drive to store #2, check oil level
  • Record today’s date and both levels.  This helps you figure out a schedule and estimate the next time you have to pickup.  Keep in mind I have to drive an hour round-trip to pickup, so I want to avoid going too early.  Because of my particular arrangement, I don’t want to call to ask the restaurants to check their oil levels for me.  I usually arrive when each barrel has 45-55 gal of WVO.  I’ve had a couple messes where they dumped more WVO than I expected and overfilled the barrels because they weren’t paying attention.  To be fair, it’s hard to see the level at night or when it’s fairly full.  I do my best to cleanup the mess when this has happened.  Be prepared.  No fun.
  • Begin pickup at store #2.  Here’s the process in detail:
  1. Put on new pair of disposable gloves
  2. Remove lid from the full drum at store
  3. Remove lid from one empty drum in my truck
  4. Run hose from pump to empty drum in truck
  5. Secure hose to empty barrel with plastic clamp
  6. Thread the custom pickup screen onto my pickup hose
  7. Use plastic clamp to secure pickup hose to full drum
  8. Connect 12v pump to 12v quick connect hanging just under the rear passenger-side anchor point on the truck bed (there are several small holes under there.  just ran the wiring up to one of those holes and used a zip-tie to secure the quick connect adapter in place)
  9. Begin pumping WVO from full barrel, careful not to pickup any of the crud from the bottom of the barrel
  10. When I reach the settling line, I stop.  Pull hose out of restaurant barrel and let pump clear the lines by filling them mostly with air.  I usually start to see cream and/or debris coming through the clear pickup hose I’m using.  This can occur with anywhere between 5-gal to 15-gal remaining in the barrel.
  11. Unthread/Remove my custom pickup screen from my pickup hose and store it in a small (1-gal?) bucket.
  12. Cleanup the ends of my hoses.
  13. Put my hoses back in the storage container that I use for my hoses and pump.
  14. Wipe off my disposable gloves so they are mostly clean.
  15. Put on dirty work gloves
  16. Slowly tip restaurant barrel side to side and watch the bottom of the barrel.  As you continue to tip side to side, you’ll loosen the debris from the bottom of the barrel.  Do this until it seems most of the debris is free.
  17. Pour the remaining oil and debris into your 5-gal bucket, then pour the bucket into the other grease container.  Repeat until the 55-gal drum is empty.  It will not be perfectly clean, but if you can get it mostly empty, you won’t have to come back to the restaurant as soon.  If you don’t do this every time and let debris build up, you’ll just make things more difficult for yourself later.
  18. Cleanup pouring edges on your 55-gal drum and your 5-gal bucket.
  19. Remove dirty work gloves.
  20. Put lids back on restaurant 55-gal drum and the (now hopefully full) 55-gal drum in truck.
  21. Remove disposable gloves.
  22. Repeat steps at store #1.  If my disposable gloves were pretty clean and didn’t tear, I use the same pair at both stores.
  • When I’m finished at each store, I also record the approximate amount that I picked up (see barrel in truck) and the approximate amount that was dumped in the rendering company’s grease container (watch how much you put in your 5-gal bucket .. 2 full buckets = 10 gal, 1-1/2 buckets = 7.5 gal, etc) so that I can approximate my consumption and monitor waste levels.
  • In the colder months (ie: consistently below 40 deg F), I have to take a 1400w drum band heater and a small portable 2000w generator with me to heat the WVO enough that I can pump it.  When I first get to the restaurant, I put on disposable gloves, fire up the generator, wrap the heater band around the drum and plug it in.  Depending on how cold it is, I sometimes have to wait 15-25 minutes and stir things up for a little while as it heats before I can actually begin pumping.  At first, I was using heavy duty aluminum foil to protect the heater band from all the crap on the restaurant’s 55-gal drum.  No matter how clean you try to keep things, it seems there is always a little bit of spill over on the outside of the drum.  I had trouble with the foil getting baked/stuck onto the drum, so I tried using a strip of aluminum from the roofing area at Lowes/Home Depot.  I had trouble keeping it clean though, because the heat would bake the sticky WVO onto the aluminum.  Probably going back to heavy duty aluminum foil this winter.  I think the foil will be best if I can find something fairly thick.  I do put it with my recycling when I’m done, so I don’t feel too bad about the waste.
  • When I get both drums back to the house, I use a collapsible engine hoist, a two foot heavy duty chain, and a 6-foot heavy duty strap (drum strap or towing strap?) to lift the drum out of the truck.  I back the truck into the garage, lift a drum, pull the truck out of the garage, lower the drum 2-4 inches above the floor so that I don’t have to worry about the engine hoist tipping over, then roll the drum over to where I keep the others and lower it onto the floor.  Repeat for second drum.
  • That’s it!  Repeat when I pickup again in a few weeks.

Custom 55-gal Lids for WVO Collection

I worked with a local shop to redesign the lids and address a few shortcomings that I experienced after using them last summer.  The restaurants had trouble pouring into the original lid design because the opening was not close enough to the edge of the barrel.  One of the hinges broke because people are pretty hard on these things.  Both issues were resolved.  Contact me if interested.  I can accept online payments and am setup to ship, whereas they are not.  The base price is $150 each, but we can do better on pricing if you are ordering multiple lids.

They use a computer controlled cutter, then weld everything together and have another local company powder-coat them.  They spend most of their days welding custom projects, so the welds are all by hand and excellent.  All in all, it takes 3-5 days to process an order for one or several lids.  If you have a barrel with a ring, you can just remove the sealing lid and use the existing ring to secure this lid.  I used to add a ring of weatherstripping around the bottom of the lid to seal it to the barrel, but ended up deciding this wasn’t necessary.

Filtering WVO

I let my drums sit for a week or two and then pump WVO from the top of the drums into my tanks.  I can usually use all but the bottom 5-gal of WVO.  I use my PVC pipe without a strainer to pickup WVO from the drum since the WVO was strained at the restaurant.  This allows me to go to about 1-2 inches above the settling line without picking up cream or debris.  I rely on the dual on-board Racor filters to catch anything that has not settled.  I pour the unused WVO from the bottom of the barrel into my dirty barrel.

When the dirty barrel is full, I let it settle for a week or so, pump any clear/usable WVO from the top, then take the remaining to the local biodiesel company for credit toward Biodiesel (B99.9).  They think my leftover WVO looks great, so I hate to imagine what they see/use.

I’ve completely abandoned the bag filters, drum filters, and other methods I’ve tried because the settling method work so well most of the year.  I do have to use a band heater to heat the barrels so that they can settle in the winter.  I haven’t been very satisfied with the results.  I managed to accumulate a surplus of WVO this summer and gravity filtered it in advance.  I’ve already pumped settled oil into a handful of drums and marked them as winter ready.  My hope is that I can use those to get past the bulk of my settling problems and then wait until spring to settle out the drums that I’d otherwise take to the biodiesel company for B99.9.

I’ve also abandoned the use of 250-gal or 330-gal IBC containers.  I just don’t feel like I’m handling enough WVO to justify using those containers.  I can’t lift the full containers in/out of my truck.  Even if I could, they don’t fit in my truck w/ the camper topper, whereas the drums DO fit under the topper.  I was able to sell the containers and the pallet jack on Craig’s List for what I paid, so trying this approach didn’t hurt the pocketbook in the end.  I was able to buy IBCs for $25-50 and sell them for $35-50.  I was able to buy/sell the pallet jack for $225.

Success Stories

Before I list the couple problems I’ve had, I wanted to be sure that this isn’t all doom and gloom.  Here are a few successes that make everything worthwhile.

  • I drive about 30k per year. I save between $750-$900 per year in fuel compared to what I would pay for fuel if I drove a Prius (my 20mpg @ $3/gal vs Prius 45mpg @ $3/gal).
  • I don’t have to drive a tiny Prius. I have a large truck with plenty of cargo room and ability to tow.
  • Even with mods, the truck cost has been around $15k (Truck $8900 + GFS $4500, Exhast $450, Intake $330, Tuning $800).  The project requires about a quarter of my garage (for drum storage) plus about 8 hours per month, plus any time I spend tinkering and learning.  I love knowing how my truck works.  I was very green when it came to most things under the hood before I undertook all of this, but I feel like I can now pinpoint most problems myself.
  • I’ve driven to see nearby family (8 hours round-trip) countless times on WVO and far away family (20-26 hour round-trip) several times on WVO.
  • I drive to see nearby vendors/customers (1 hour round-trip) many times each week on WVO.  I’ve driven to see regional vendors/customers (3 hours round-trip) many times on WVO.  I’ve driven to see other vendors/customers (40-50 hours round-trip) several times on WVO.

Problems Encountered

Here are a list of problems I have encountered over the past year or so.  The first two are probably a result of operator error (my fault), while the last two may or may not be WVO related.  I’m not including details regarding other general maintenance issues that have come up over the past year or so such as replacing my batteries, front wheel hub assemblies, fan clutch, fly-wheel and main seal, or having my alternator rebuilt, etc.  All of those items total maybe $1500-2000.

  • I was using modified (warmer) internal heaters in my Racor filters.  The 200W heaters both failed for unknown reasons and the first replacement also failed.  This happened sometime last winter.  I suspect that I might have run the filters dry and the heaters did not have any type of overheat sensor to protect themselves.  I am now using 75W heater wraps and insulating foam on the outside of the filter canisters (purchased from Golden Fuel Systems).  With the insulation, the filters seem to reach the same temperature as before.  Symptoms of heater failure include low fuel pressure, since quite a bit of WVO heat apparently comes from the filters.  I usually see 60psi on the fuel supply.  I was seeing the pressure gradually drop to 50-40-30-20 psi on the highway (65-70 mph) until horrible/unusable performance as I clogged my factory filter under the hood with cooler WVO.  I unnecessarily replaced several factory filters before I realized that I was just clogging filters because my heaters had failed.  I figured out that this was a heat issue when I realized that I could pull over and idle for 5-10 minutes to melt whatever had built up on the factory fuel filter.  My fuel pressure would show the normal 60psi again for a while.
  • I have two 60-gal tanks in my bed.  I fill the “dirty” tank and then use a switch in my cab to pump fuel from the “dirty” tank through a Racor filter and into the “clean” tank.  I’ve accidentally forgot to monitor progress and overflowed the clean tank on two separate occasions, making HUGE mess each time!  I thought the overflow would return to the dirty tank, but apparently the hose between tanks is just an air vent.  If this happens to you, it will ruin your day… and possibly everything you happen to have in the bed of your truck.  🙁
  • My oil analysis is showing problems from either a coolant leak within the engine or possibly a WVO related issue, plus additional engine wear.  See my separate UOA posts as I publish each analysis I’ve received. Per their recommendation, I’m planning to run diesel for an 3k oil change interval so they can tell me if that clears up the symptoms.  My guess is that I do have a coolant leak, though the leak has slowed because I haven’t had to add coolant recently.  I’m also guessing that I have extra engine wear due to WVO, though I’ve known/expected that to happen all along.  Worse case scenario, I’m planning/prepared to replace the engine if it gets to that point.  I don’t have a spare on hand, but have been keeping an eye out for a good deal on Craig’s List from time to time.
  • My fuel pressure recently increased from 60psi to 75-85psi and sometimes even to the peg (100psi).  The high pressure (possibly 100-120psi) cracked the cap for my fuel filter bowl under the hood and made a huge mess.  A replacement cap held until I could take things apart and troubleshoot.  When I took the assembly apart, I did find chunks of baked WVO in the pressure relief valve/housing.  I cleaned it out but that did not solve the problem.  There is a pressure relief valve on the top driver’s side of the fuel filter bowl that sends fuel back to the diesel tank via the return fuel line.  There is a plunger and spring that keeps the pressure in the bowl at 60psi.  I swapped those parts with a friend’s 7.3L and had the same problem.  I swapped the *housing* with his 7.3L and problem was solved.  Replacing the housing fixed the high pressure problem, though we do not understand why.  When we compared the housings, his housing did look like it was in better condition, but we couldn’t see anything that would prevent the plunger from opening and result in the sporadic higher fuel pressure in my 7.3L PSD (75-100+ psi).  Maybe a WVO issue, maybe not.  Very strange.

Truck Modifications

My truck is a 2002 Ford F-250 w/ 7.3L PSD.  I installed several supporting modifications so that I could ultimately install a tuner from DP Tuner to increase my MPG, which would obviously decrease the amount of Diesel and WVO that I consume.  I start the truck on Diesel, wait for the engine to reach normal temperature, then switch to WVO.  I switch back to Diesel about 5 minutes (or 2 miles) before I get home (or stop anywhere for an extended period of time).

  • ISSPRO Gauge Set from Diesel Manor 08/2009 – Pre-Turbo Pyrometer, Transmission Temp, Fuel Pressure (0-100psi), Turbo Boost (0-30psi)
  • Thermostat (203 deg F) and Thermostat Housing from Diesel Site 05/2010
  • Switch from Green Coolant to Red Coolant (Fleetrite ELC) ~05/2010
  • Silverline 4″ 409 Turbo-Back Exhaust from Alligator Performance 06/2010
  • S&B Air Intake from Diesel Manor 07/2010
  • F8 Chip and Live Tuning from Jody at DP Tuner 08/2010.  I usually run the 60hp Economy tune and have been experiencing between 18-20mpg for the past two months.  FYI – Jody monitored oil temps and recommended replacing the Thermostat (203 deg F) with my stock thermostat to avoid high temperature problems with his tunes.