WVO kit installation (session 3) …
This is the third weekend of work on the WVO conversion. To recap, we pre-drilled holes before installation of spray-on bed liner the first weekend, we mounted tanks and plumbed coolant to heat exchangers the second weekend.
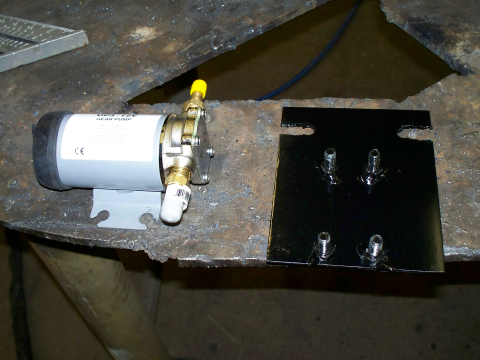
This weekend we finished plumbing and wiring in the bed, into the fuel system, and under the hood. We put about 10-gal of diesel #2 in each 60-gal tank. We built the bracket below so that we could mount the onboard 3-gpm pump to the side of the tanks (between Racor filters). We ran a spare wire to the bed to power the collection pump. We plumbed the Pollak 6-port valve into the fuel system. We installed the six-fuse block and relays under the hood. We ran electrical into the cab. We began work on wiring harnesses for the 3 gauge pod (front fuel level, rear fuel level, fuel vacuum). This was a LONG day because we thought we’d be able to finish. We called it a night at 3-4AM and figured we’d finish the electrical later. For now, the factory/diesel side of the Pollak valve is open.
Picture of the custom mounting bracket for the onboard 3-gpm pump:

The truck started right up when we were finished. I only made it about two blocks before the truck died. We forgot to prime the fuel lines. I had a vacuum for this, but we simply forgot to use it. I immediately suspected that air had worked it’s way up to the IP and it wasn’t getting any fuel. We weren’t able to start it, so we ended up towing it back to the shop and putting it on the charger. We tried starting it a few times again the next morning to no avail. I’d crank for 5-7 seconds, then wait about 60 seconds. Repeated at least 20-30 times. Put it back on the charger and took a break for lunch.
I sent out an SMS to several farm and truck friends asking for advice. Several people suggested opening the injector relief valve. I was unable to locate anything like this. Instead, I opened the water drain valve on the back of the fuel filter (aka fuel/water separator). I turned the ignition to start (but not all the way to crank) so that the fuel pump could pressurize the system again. I opened the valve again. I could tell that liquid was draining the second time. After that, the truck started right up but still occassionally stuttered (small air bubbles in system?) so I forced it to idle high (1500-2000) for about 12-15 minutes. RPM would occasionally drop, but never enough to die since it was idling high. It was acting pretty normal after about 8-10 minutes, so we called it good. I had no other issues running off the factory diesel tank after that.
UPDATE: 02/23/2009
I located the hot wires I needed under the dash. I finished prep work for the gauge wiring harness, labeled gauge and switch wiring. I left the radio play the whole time .. and the headlights on. Oops! I couldn’t start the truck to move it out of the garage because battery was too low. I jumped the truck, moved it, put it on charger for the night.
UPDATE: 02/24/2009
The truck seemed fully charged and started right up in the morning. It didn’t start when I tried to leave the office for a lunch meeting, so I got a jump from someone at the business next door. The truck didn’t start after my lunch meeting either. We tried to jump it, but weren’t getting a spark at all. Mike towed me to the repair shop, where they quickly determined that my starter had failed. Well crap. Wish I’d known about the relief valve before I worked my starter to death trying to purge air from the fuel system two days ago. They also confirmed that my batteries had a full charge, which explained the no spark. You’ll only see a significant spark between batteries if there is a significant difference in chages between the batteries. It is unlikely that the jump start before lunch actually helped the truck start.